

Set up the Exact Online connector
Everything you need to connect one or more Exact Online administrations to Salesforce, decide which data flows where, and automate it with Salesforce Flow.
How the connector works
You configure the connector entirely with records in Salesforce, in the Exact Configuration app. Three configuration layers build on each other, and data moves in two directions.
| Layer | What it defines | You create |
|---|---|---|
| Session Configuration | Which Exact Online administration you connect to, and when the batch runs | One per administration |
| Object Configuration | Which Salesforce object maps to which Exact Online endpoint, and in which direction | One per object and method |
| Field Configuration | Which fields are mapped within an Object Configuration | One per mapped field |
Checklist
- The Influx package is installed and you can open the Exact Configuration app.
- You have an Exact Online user with rights to the administration(s) you want to connect.
- Every Salesforce object you want to sync has a text field marked as External ID for the Exact Online ID.
- You have the Exact Online API documentation at hand to look up endpoints and field names.
Session Configuration
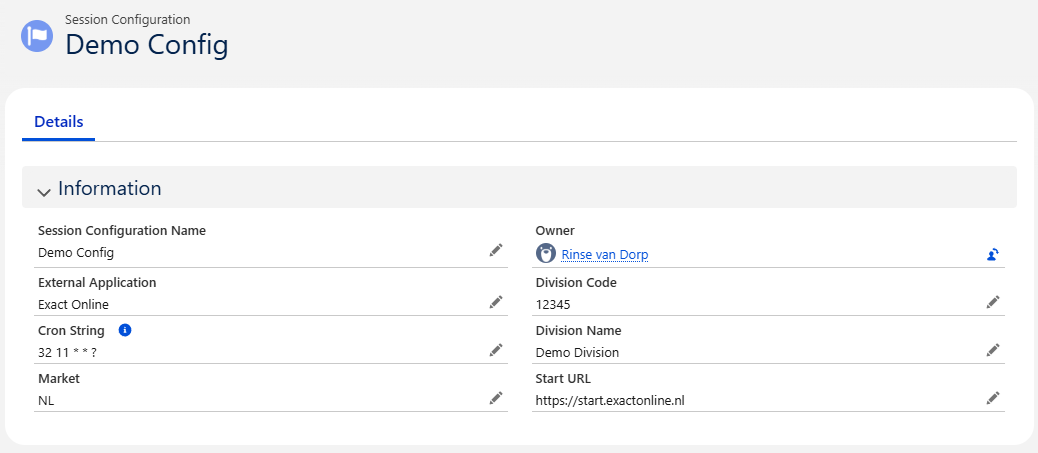
Set up one or more Exact Online administrations and authorise them with Salesforce. This is the starting point: each administration must be securely connected before any data can be synchronised.
Exact Configuration › Session Configuration › New
| Field | Description |
|---|---|
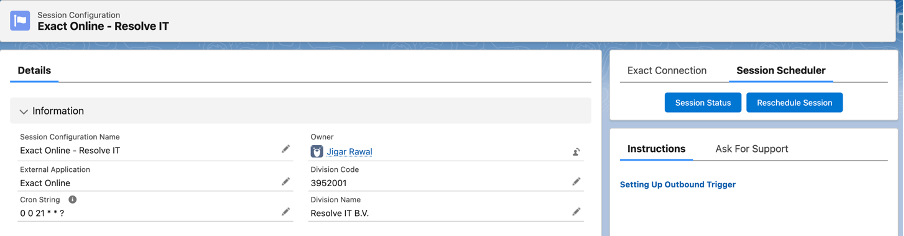
| Session Configuration Name | A name of your choice. We recommend the connector name plus the Salesforce org, e.g. Exact Online - Resolve IT. |
| External Application | Records which external system this Salesforce org syncs with. |
| Division Code | The code of the Exact Online administration. A separate code per session lets you open multiple connections from one Salesforce org. |
| Division Name | A readable name for the administration, useful when you connect several. |
| Cron String | Schedules the batch that retrieves data (GET) for this session. Example, every day at 21:00: 0 0 21 * * ?. The field’s help text lists more options. |
| Market | The country where your Exact Online database is hosted, e.g. NL. |
| Start URL | The start URL for that market: NL https://start.exactonline.nl · BE https://start.exactonline.be · FR https://start.exactonline.fr · DE https://start.exactonline.de |
| Client ID & Client Secret | Leave both empty. They are filled in automatically when you save the record. |
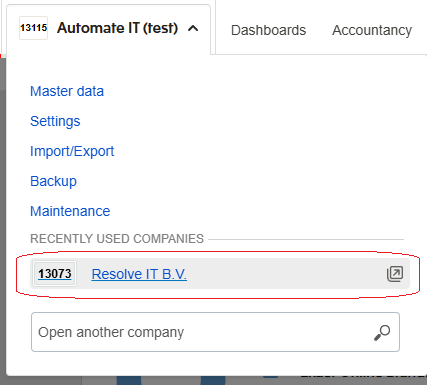
Finding the Division Code
- 1
In Exact Online, click your company name at the top and select the administration you want to connect.
- 2
Copy the Division Code from your browser’s address bar: the number after
_Division_=.
💡 Multiple administrations? Create one Session Configuration per administration. Object Configurations belong to a session, so each administration gets its own set of mappings.
Authorising the session
Make sure you’re already signed in to Exact Online before you start.
- 1
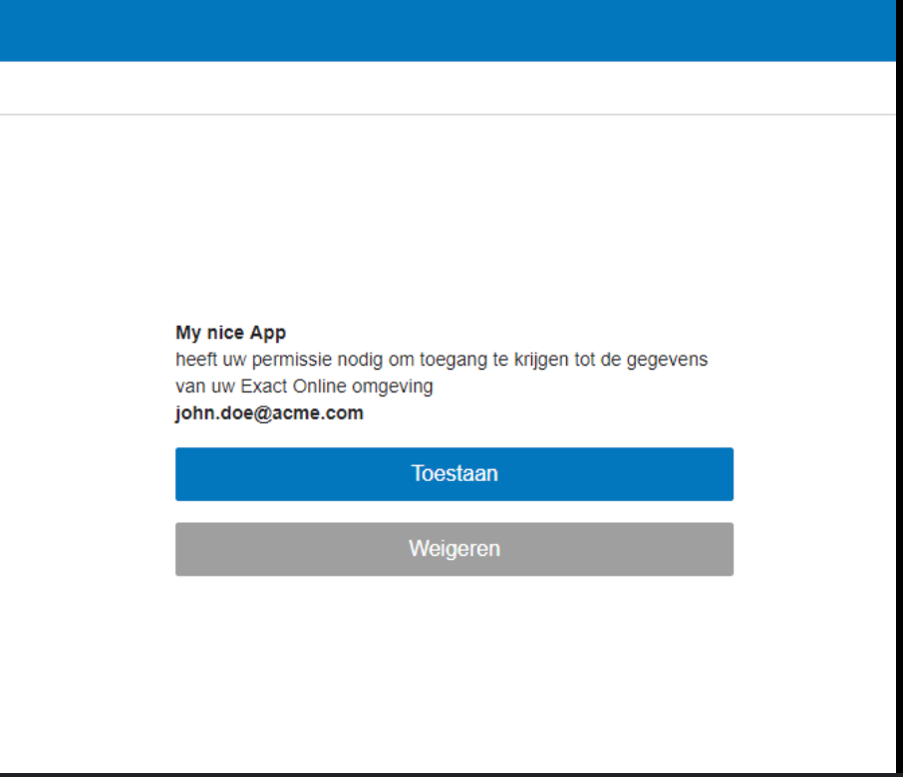
Renew Token
On the new Session Configuration, click Renew Token. You’re sent to Exact Online’s authorisation page. Click Toestaan (Allow) to give Influx access.
- 2
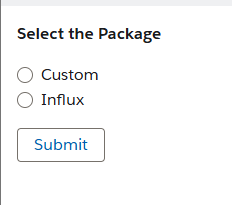
Select the package
When asked which package to use, select Influx. Only choose Custom if you know you’re using a custom package.
- 3
Sign in to Salesforce
Sign in to Salesforce to complete the connection. Working in a Sandbox? First change
login.salesforce.comin the address bar totest.salesforce.com, press Enter and sign in with your Sandbox credentials.
Scheduling the batch
Once authorisation is complete and the Cron String is filled in, open the Session Scheduler tab on the Session Configuration and click Session Status. This schedules the batches; if they’re already scheduled, you’ll see a message that the batches are active. Reschedule Session schedules the batches again, for example after you change the cron string.
Object Configuration
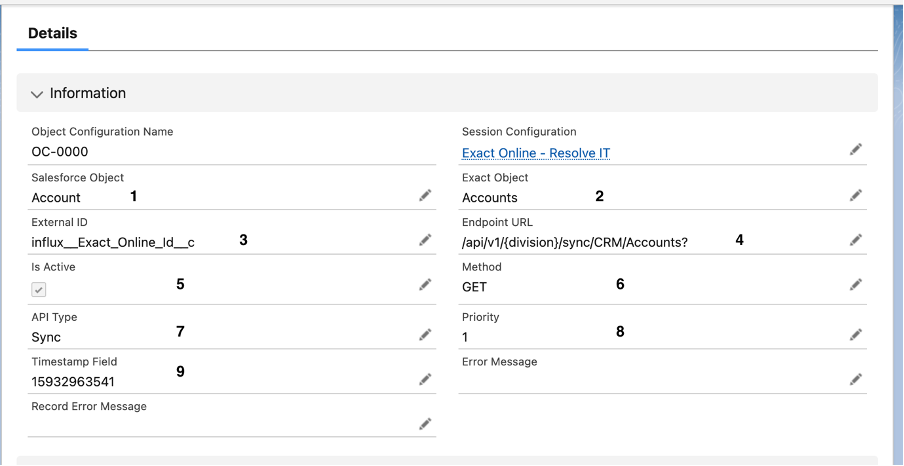
Choose which objects you synchronise between Salesforce and Exact Online. Only objects you enable take part.
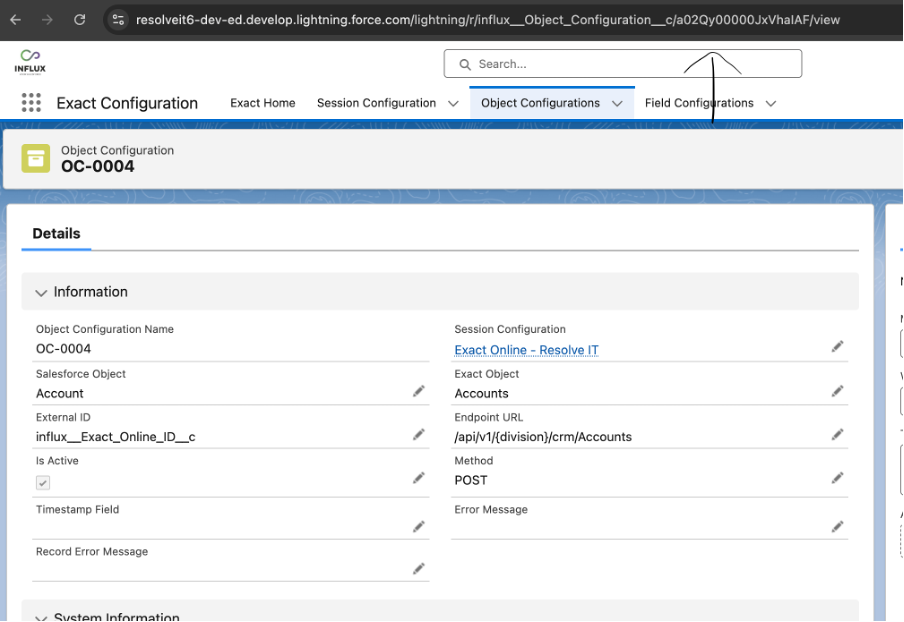
Exact Configuration › Object Configurations › New
| Field | Description |
|---|---|
| 1 Salesforce Object | API name of the Salesforce object, e.g. Account. |
| 2 Exact Object | API name of the Exact Online entity, e.g. Accounts. |
| 3 External ID | API name of the Salesforce field that stores the ID coming from Exact Online. The field must be marked as External ID in its field settings, otherwise it isn’t recognised. |
| 4 Endpoint URL | The Exact Online endpoint for this entity, taken from the API documentation. Make sure it matches the operation you want to perform; {division} is filled in from the session. |
| 5 Is Active | Only active configurations are picked up by the scheduled batch. |
| 6 Method | GET: retrieves data from Exact Online into Salesforce. POST: creates records in Exact Online. PUT: updates existing records in Exact Online. |
| 7 API Type (GET only) | The type of Exact Online API used to retrieve data, e.g. Sync together with a sync endpoint. |
| 8 Priority (GET only) | The order in which configurations run in the nightly batch. Retrieve parent data first (e.g. accounts before invoices) so relationships can be resolved. |
| 9 Timestamp (GET only) | The moment of the last successful retrieval. The next run only fetches data changed after this timestamp. |
Field Configuration
Define which fields are included for each object. Map only the data that matters to keep the integration fast and clean.
Exact Configuration › Field Configurations › New
| Field | Description |
|---|---|
| ERP field API Name | API name of the field in the Exact Online entity, as listed in the API documentation. |
| Salesforce Field | API name of the Salesforce field linked to the Exact field. For POST and PUT, the value is read from the record and sent to Exact Online. |
| Fixed value (POST / PUT) | Sends a static value instead of a field value from the record. Useful for defaults that are the same for every record. |
| Reference field | Tick this when the value comes from a lookup relationship in Salesforce. |
| Parent Object API | API name of the parent object in the lookup relationship. |
| Parent External ID | API name of the External ID field on the parent object. Example: a contact references its account’s Exact Online ID via Contact → Account → External ID. |
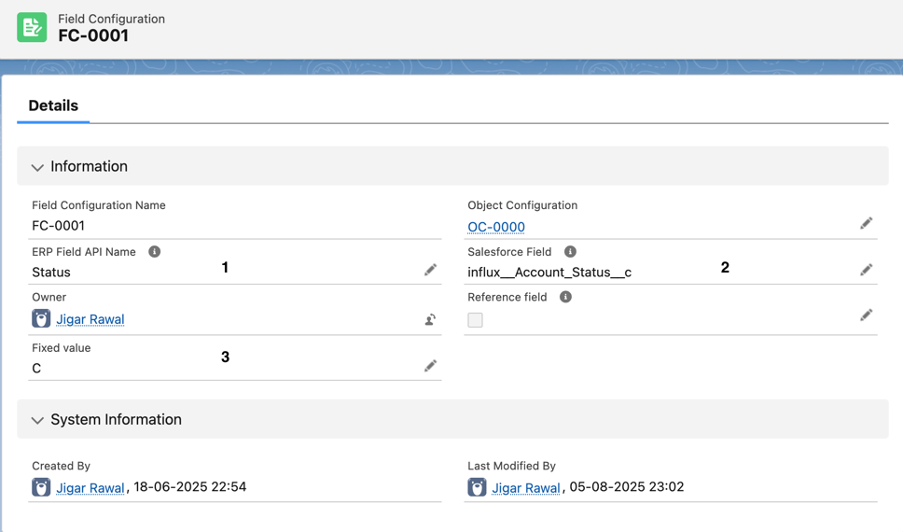
Status, Salesforce field influx__Account_Status__c and fixed value C.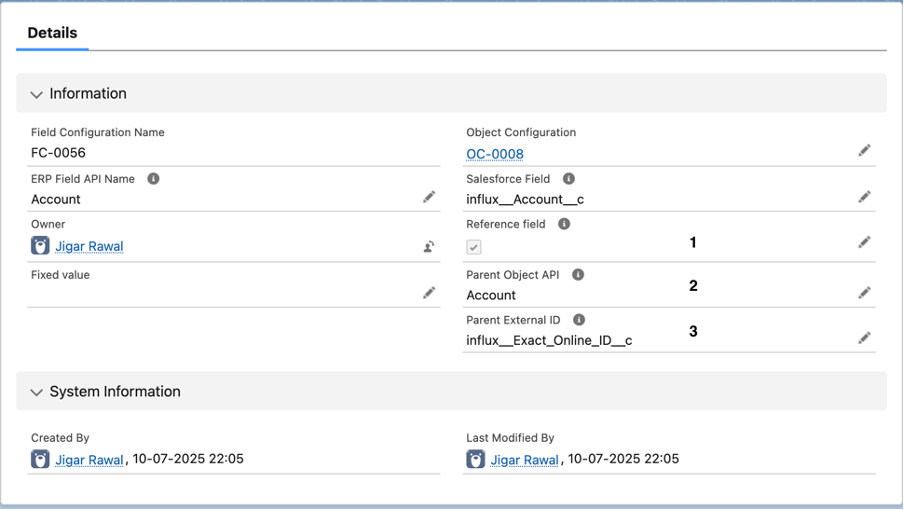
Account receives the Exact Online ID of the related Salesforce account.For a full overview of the fields available per entity, see the Exact Online API documentation.
Salesforce Flow actions
Data sent from Salesforce to Exact Online is always triggered by a Salesforce Flow. That way you decide exactly when and under which conditions information is pushed, in line with your own processes. The connector adds Apex actions for this that you use in record-triggered flows and screen flows.
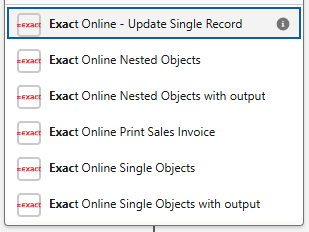
| Action in Flow Builder | Use it for | |
|---|---|---|
| Exact Online Single Objects | Sending one record, such as an account, address or bank account | 4.1 |
| Exact Online Single Objects with output | As above, with the response returned to the Flow | 4.1 |
| Exact Online Nested Objects | Sending a header with lines, such as an invoice, order or sales entry | 4.2 |
| Exact Online Nested Objects with output | As above, with the response returned to the Flow | 4.2 |
| Exact Online Nested Objects - Bulk | Sending many nested records at once, within the rate limit | 4.2.1 |
| Exact Online Print Sales Invoice | Processing an invoice after it has been created (email, Peppol) | 4.3 |
| Exact Online Print Sales Invoice - Bulk | Processing many invoices at once | 4.3.1 |
| Exact Online - Update Single Record | Retrieving one record from Exact Online on demand (GET) | 4.4 |
influx__Object_Configuration__c/.4.1 · Send single records (POST / PUT)
For objects without lines: accounts, addresses, bank accounts and similar records. The Object Configuration you pass in determines whether a record is created (POST) or updated (PUT).
- 1
Create a record-triggered flow on Account and add an asynchronous path.
- 2
Set the entry conditions. In this example, the account is only sent when
Clean StatusequalsIn Sync. Any condition or query works; send the record once the result is right.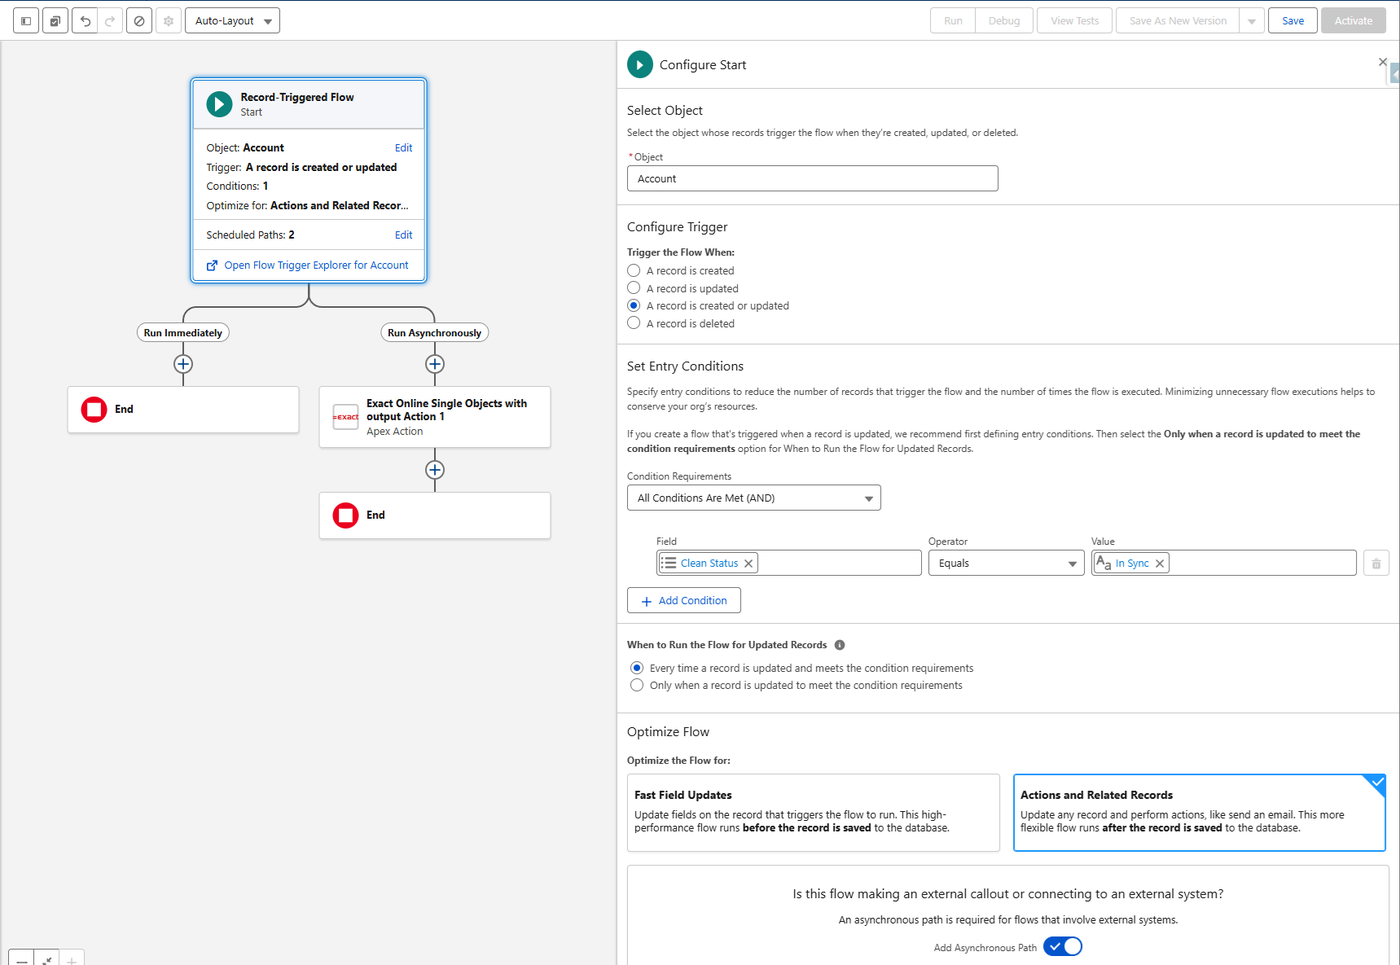
- 3
Add the action Exact Online Single Objects with output. Set Salesforce Id for the Entry Record to the triggering account’s ID (
{!$Record.Id}) and Salesforce Id for the object configuration to the ID of the Account POST configuration.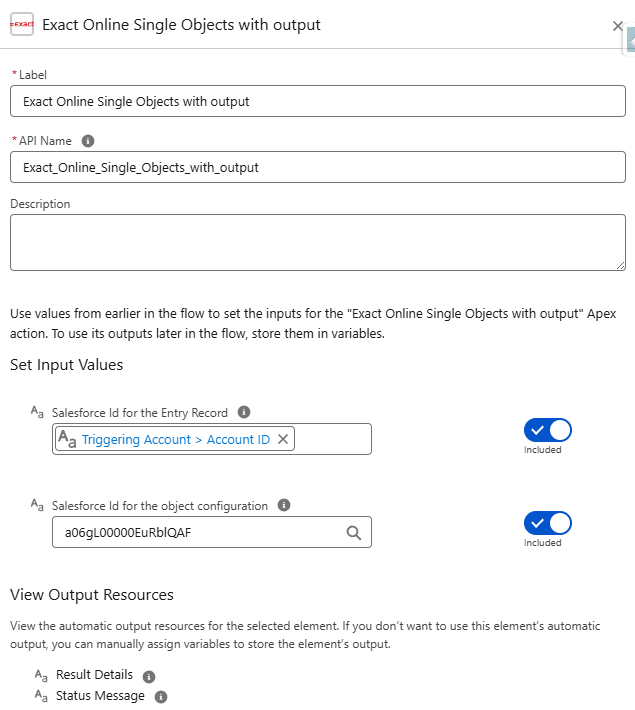
Outputs:
Result Details,Status Message. - 4
Save and activate the Flow. The Apex class handles the rest.
4.2 · Send nested records (POST / PUT)
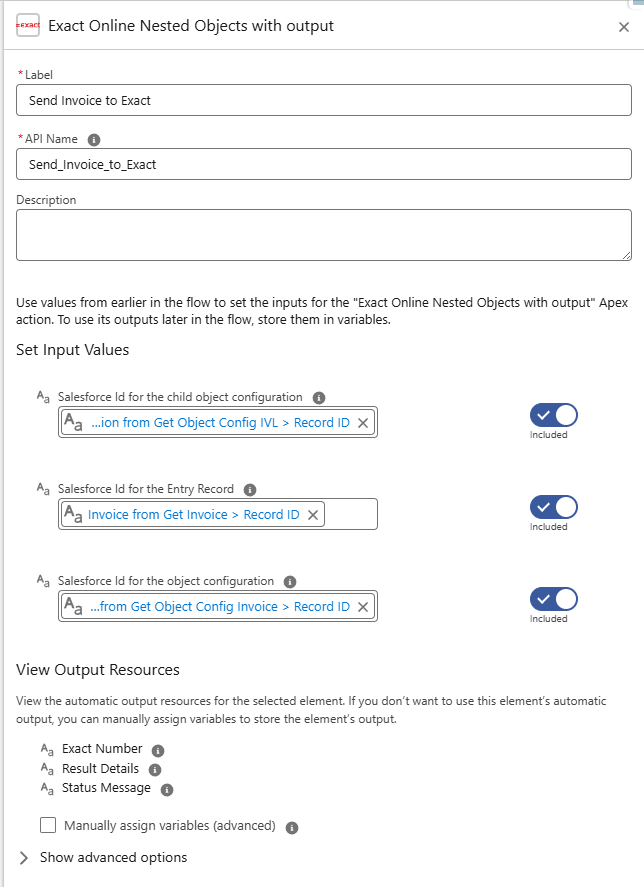
For a header with child lines: invoices with invoice lines, orders with order lines, sales entries with entry lines. You pass one configuration for the header and one for the lines.
| Input | Value |
|---|---|
| Salesforce Id for the Entry Record | The invoice record ID |
| Salesforce Id for the object configuration | ID of the invoice (header) configuration |
| Salesforce Id for the child object configuration | ID of the invoice line configuration |
Outputs (with output variant): Exact Number, Result Details, Status Message.
4.2.1 · Send nested records in bulk
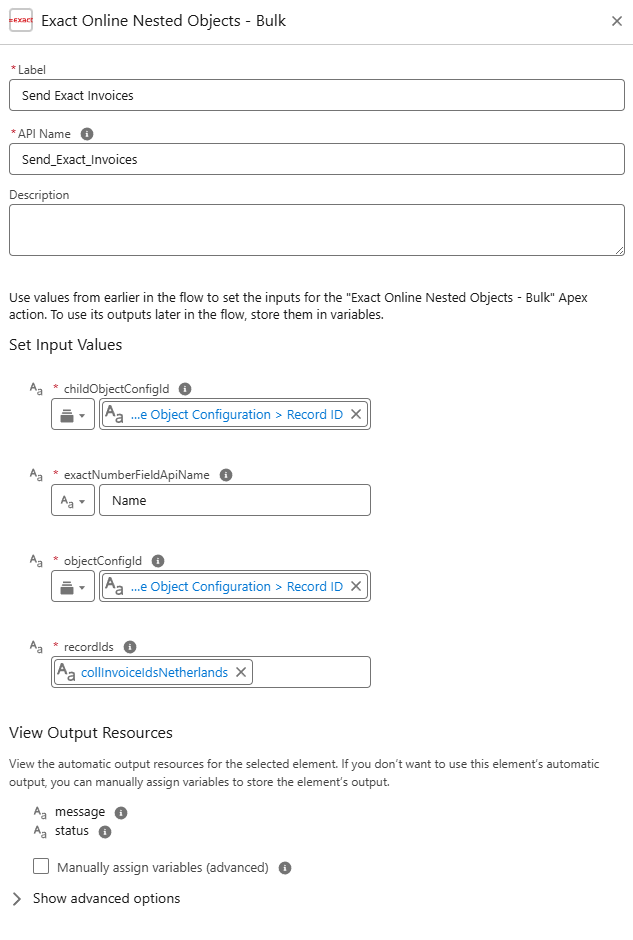
Exact Online allows 60 calls per minute. A record-triggered flow quickly exceeds that when many records are sent at once. The bulk action processes each record separately with a short delay, so every record is handled regardless of the quantity.
| Input | Value |
|---|---|
| recordIds * | A text collection of record IDs, e.g. collInvoiceIdsNetherlands |
| objectConfigId * | ID of the header configuration |
| childObjectConfigId * | ID of the line configuration |
| exactNumberFieldApiName * | The field the EntryNumber is written back to, which Exact returns for invoices, orders, sales entries and purchase entries, e.g. Name. |
Outputs: message, status.
4.3 · Process sales invoices
After an invoice with lines has been created in Exact Online (see 4.2), it still has to be processed: printed, emailed or sent via Peppol. The Exact Online Print Sales Invoice action lets you define how.
| Input | Description |
|---|---|
| Boolean for sending invoice as email | True: Exact Online generates the invoice and emails it. |
| Boolean for sending invoice as Peppol | True: Exact Online sends the invoice over the Peppol network. |
| Boolean for sending invoice based on account preference | True: follows the preferred sending method set on the account in Exact Online. |
| Exact Id for the Invoice Record | Exact Online ID of the invoice to process. |
| Salesforce Id for the Invoice Record | Salesforce ID of the same invoice. |
| Salesforce Id for the Session configuration | Determines which administration the invoice belongs to. |
| Exact online ID for document layout | Optional. Sets the invoice document layout. |
| Exact online ID for email layout | Optional. Sets the email template. |
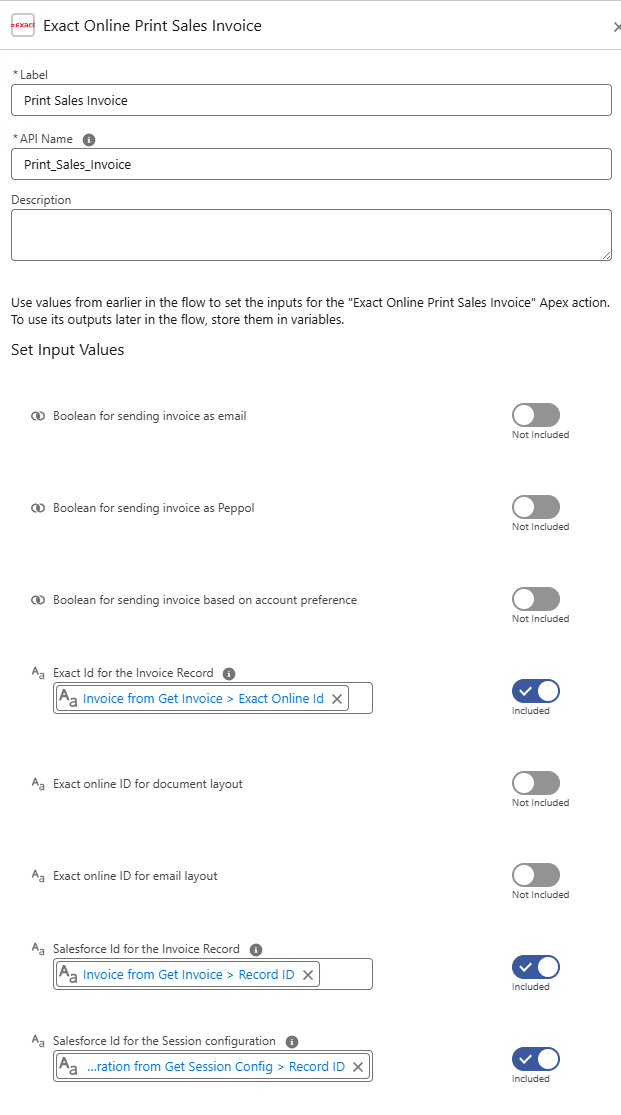
💡 Document and email layouts require their Exact Online IDs. Retrieve the layouts into Salesforce first (with a GET configuration), then reference them in the Flow.
4.3.1 · Process sales invoices in bulk
Exact Online interrupts multiple simultaneous print calls even sooner than regular updates. The bulk action handles each invoice separately with a short delay.
- 1
Group invoices by processing method
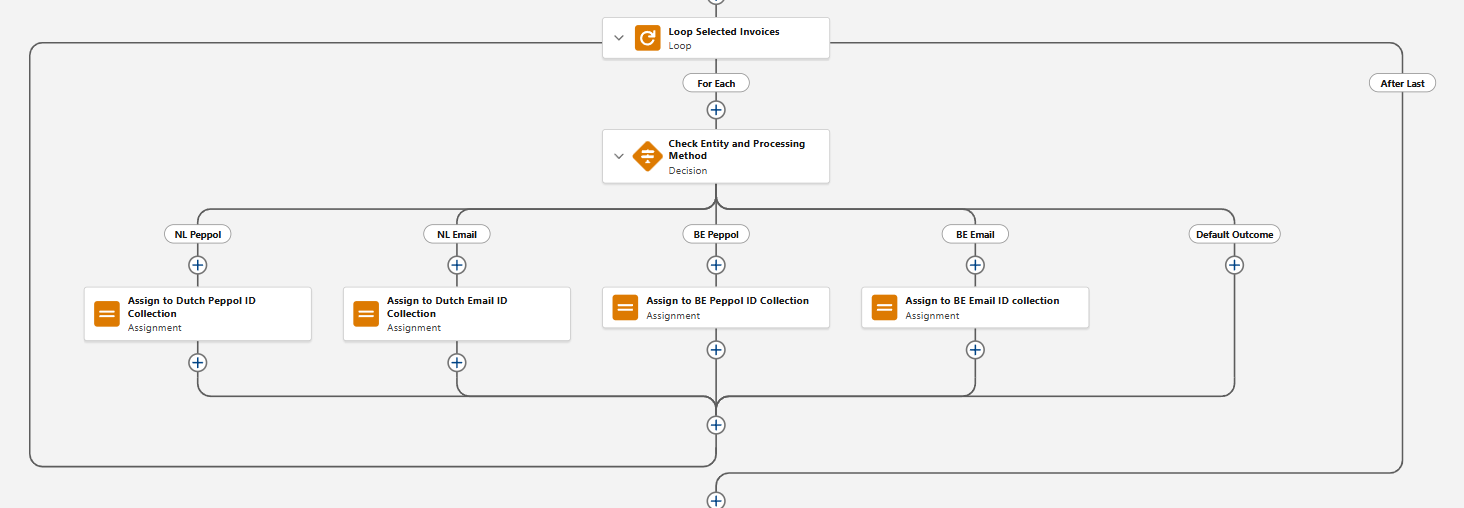
The bulk action’s settings apply to every invoice in the collection, so build one collection per combination, e.g. Dutch entity via Peppol and Belgian entity via email. A Loop with a Decision per entity and method works well.
- 2
Fill two text collections per group
Use Assignment elements: one collection for Salesforce record IDs (e.g.
collInvoiceIdsNLPeppol) and one for Exact IDs (e.g.collInvoiceExactIdsNLPeppol).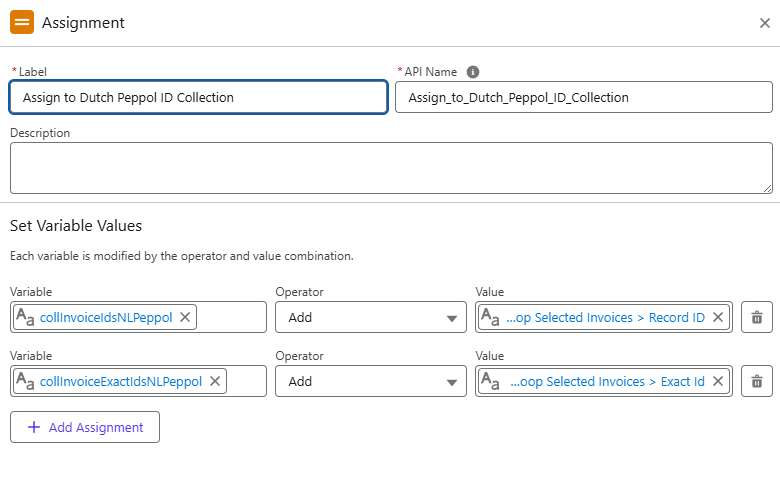
- 3
Add the bulk action per group
Use Exact Online Print Sales Invoice - Bulk with the inputs below.
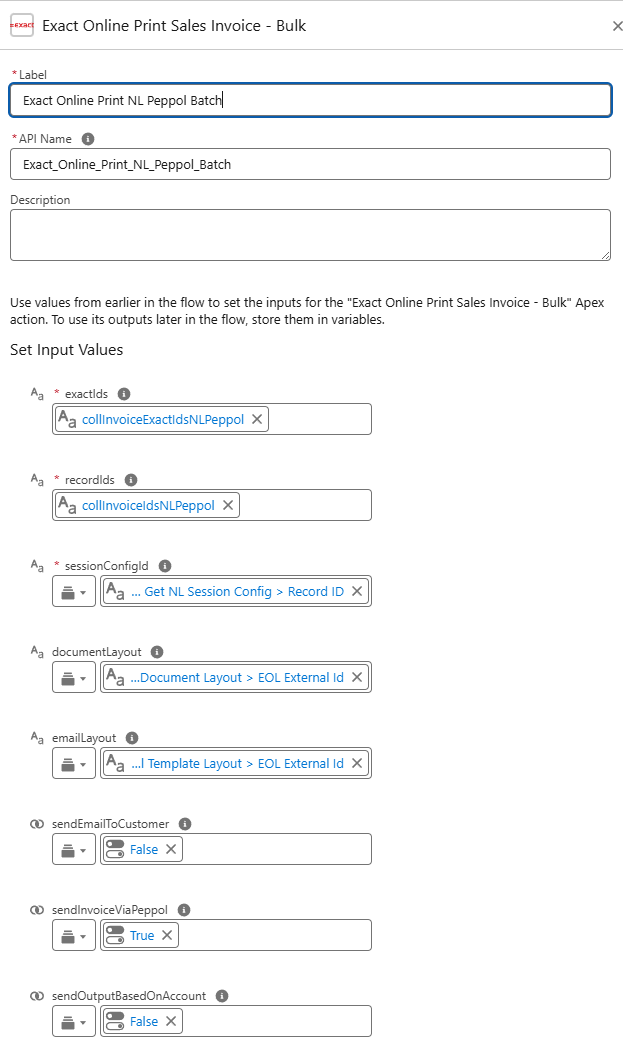
| Input | Value |
|---|---|
| recordIds * | Collection of Salesforce invoice IDs |
| exactIds * | Collection of Exact Online invoice IDs |
| sessionConfigId * | ID of the Session Configuration for this administration |
| documentLayout | Exact Online ID of the document layout |
| emailLayout | Exact Online ID of the email template |
| sendEmailToCustomer | True / False |
| sendInvoiceViaPeppol | True / False |
| sendOutputBasedOnAccount | True / False |
4.4 · Retrieve one record by Flow (GET)
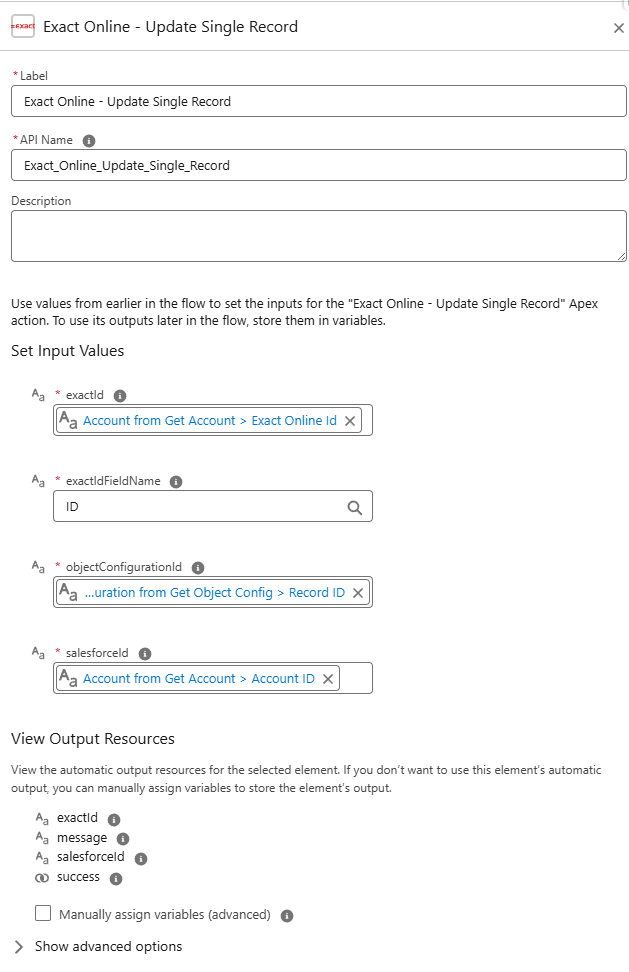
GET configurations normally run through the scheduled batch (see the cron string in step 1). Need up-to-date data from Exact Online right away? Use the Exact Online - Update Single Record action to retrieve a single record.
| Input | Value |
|---|---|
| exactId * | The Exact Online ID stored on the Salesforce record |
| exactIdFieldName * | API name of the field that identifies the record in Exact Online, e.g. ID |
| objectConfigurationId * | ID of the Object Configuration with the GET method |
| salesforceId * | ID of the Salesforce record to update |
Outputs: exactId, message, salesforceId, success (true/false).
Error component
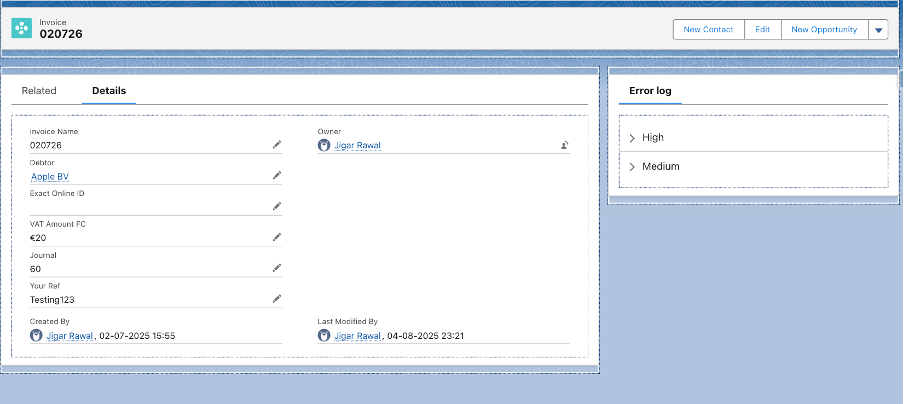
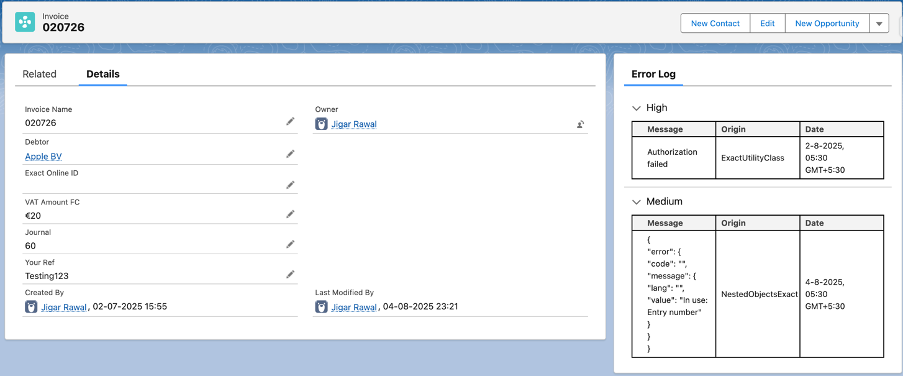
Add the error component to your record pages, so users see what went wrong during synchronisation, right where they work.
- 1
Open a record of the object, click the gear icon and choose Edit Page to open the Lightning App Builder.
- 2
On the left, under Custom, find the
viewrecorderrorscomponent.
- 3
Drag it onto the page. The top of the right-hand column keeps errors visible, but choose whatever spot suits your users. Save and activate the page.
Reading the error log
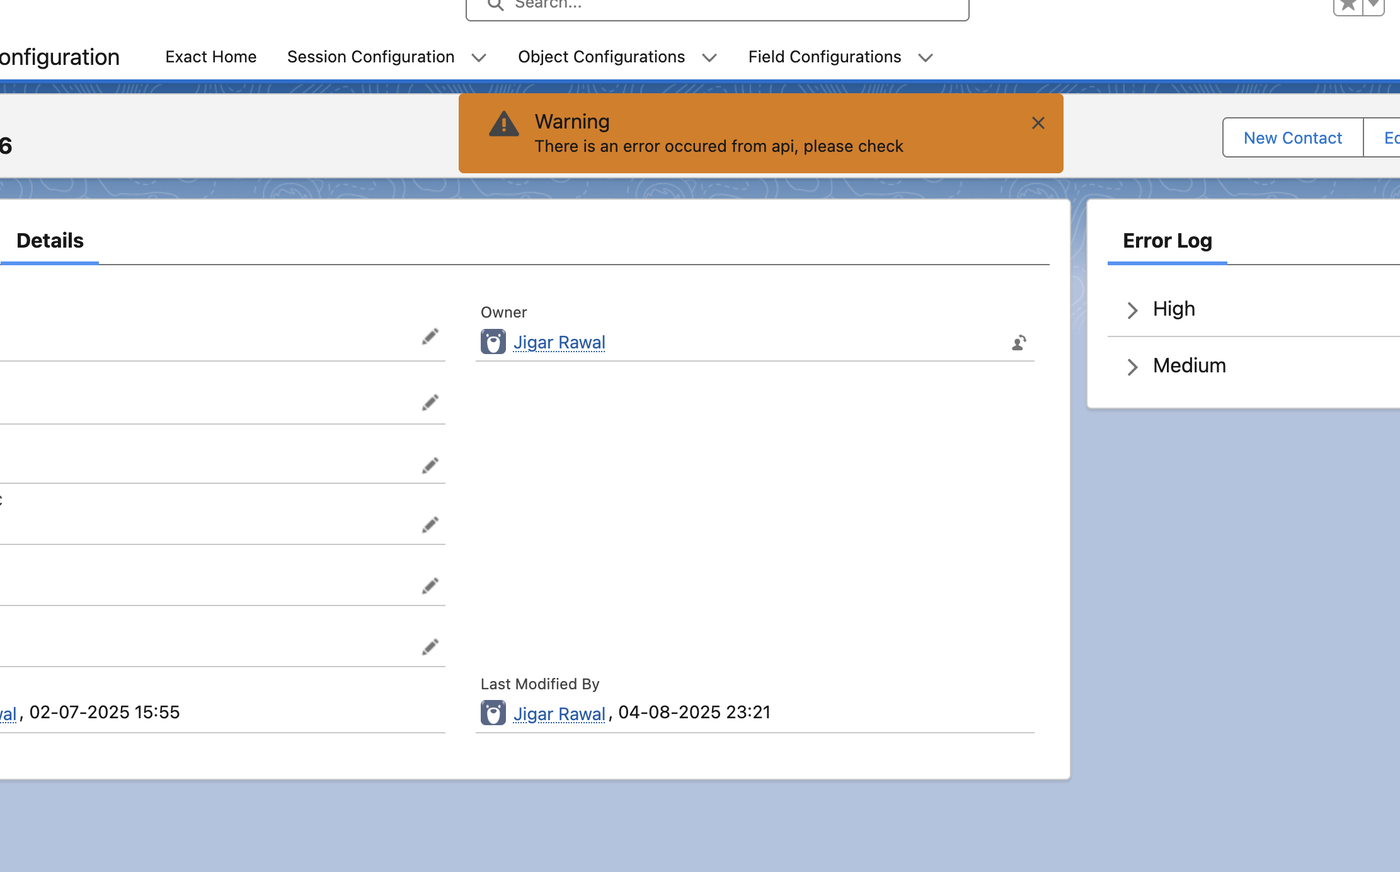
Each error shows the message, its origin (the Apex class) and the date and time. Errors are sorted by priority:
| Priority | Example | Behaviour |
|---|---|---|
| High | Unauthorized: the connection to Exact Online is no longer valid | Also shown as a warning toast the first time the record page is opened |
| Medium | User errors, such as an entry number that’s already in use | Shown in the component |
Response codes & fixes
The Exact Online API returns an HTTP status code for every call. The error component shows this code together with Exact’s message.
| Code | Meaning | What it tells you |
|---|---|---|
| 200 | OK | GET succeeded. An empty result can also mean the user lacks rights to that data. |
| 201 | Created | POST succeeded. |
| 204 | No Content | PUT or DELETE succeeded. |
| 400 | Bad Request | The request is malformed. Fix the mapping before retrying. |
| 401 | Unauthorized | Authentication is invalid or expired. |
| 403 | Forbidden | The linked user lacks rights, or has no access to the administration. |
| 404 | Not Found | The requested record doesn’t exist. |
| 408 | Request Timeout | The request took too long. |
| 429 | Too Many Requests | Exact Online API limits were exceeded. |
| 500 | Internal Server Error | Usually a functional validation error from Exact Online. |
| 503 | Service Unavailable | Exact Online is temporarily unavailable. |
400 Bad request
- Mandatory filter missing: some endpoints require a
$filterparameter on GET. Check the endpoint in the API documentation. - Wrong data type: e.g. comparing a GUID with a number. Check the field types in your Field Configuration.
- Invalid property: an ERP field API Name doesn’t exist on that entity. Check spelling and casing.
- Token refreshed too early: an access token is valid for 10 minutes and can only be refreshed after 570 seconds. Wait and retry.
401 Unauthorized
- The access or refresh token has expired or was already used. Re-authorise the Session Configuration with Renew Token.
- Several authorisations were started for the same connection; only the latest is valid. Re-authorise once.
403 Forbidden
- Insufficient rights: check the linked user’s rights in Exact Online under My Exact Online › Rights.
- Wrong administration: check the Division Code on the Session Configuration.
- Administration not permitted for the app: add the company via My Exact Online › Security centre › my app’s permissions.
- Inactive user: reactivate the linked user in Exact Online.
- Administration blocked or archived: during a backup or database move, wait until it finishes. Archived administrations can’t be accessed.
- Licence: not every endpoint is available in every Exact Online package. Check the endpoint in the API documentation.
408 Timeout
- The request is too broad or the administration is very large. Map fewer fields, or use Exact’s sync endpoints for large GET volumes.
429 Too many requests
- Use the bulk actions (4.2.1, 4.3.1) when many records are sent at once. See also Exact’s API limits.
500 Internal server error
- Usually the same validation error a user would see in Exact Online itself, e.g. a record that can’t be deleted because it’s used elsewhere. Read the message in the error component.
- A generic “A problem has occurred” message usually points to an issue on Exact’s side. Report it to Exact API Support with the reference number (within 24 hours).
503 Service unavailable
- Exact Online runs maintenance daily between 04:00 and 04:30 (CET). Don’t schedule the batch in that window.
- Otherwise, retry later.
Need help?
Our consultants are happy to help you set up the connector.